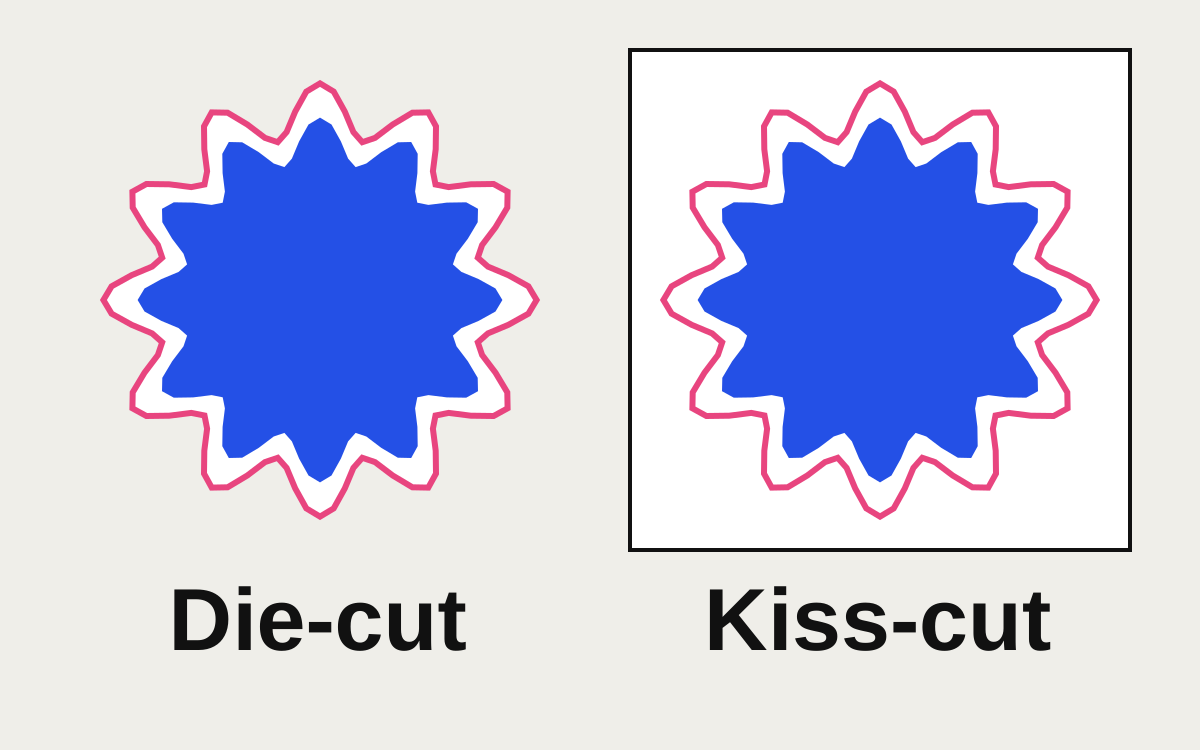
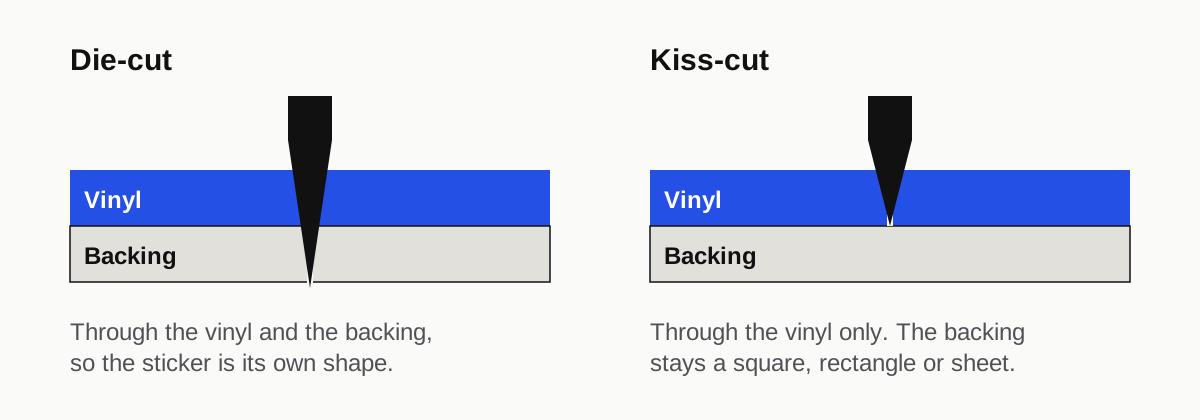
A die-cut sticker is cut all the way through the vinyl and its backing paper, so the finished sticker is its own shape. A kiss-cut sticker is cut through the vinyl only, leaving the backing as a square, rectangle or sheet around it, which makes it easier to peel and leaves room for printing on the backing. For either, the file needs the same thing: one smooth, closed cut path on its own layer, in a named spot color, with the artwork bleeding past it, usually by about 0.0625 to 0.125 in.
Which to choose
| Die-cut | Kiss-cut | |
|---|---|---|
| What's cut | Vinyl and backing, to the sticker's shape | Vinyl only; backing stays a simple shape |
| Looks like | A loose sticker in the shape of the design | A sticker sitting on a square or rectangular backing |
| Peeling | Harder to start, especially on small or rounded shapes | Easier: you bend the backing and the edge lifts |
| Best for | Giveaways, packaging inserts, laptops and bottles, where the shape is the product | Sticker sheets, small or intricate shapes, stickers handed out by the dozen |
| Room for extra info | None | The backing can carry a logo, URL or instructions |
| Shape limits | Tighter: thin parts can tear when the shape is cut through | Looser, because the backing supports the shape |
There are also sticker sheets, several kiss-cut stickers on one backing, and roll labels, which are kiss-cut onto a continuous liner for hand or machine application. The cut path rules are the same for all of them.
How the cut line works
The cutter (a digital plotter on short runs, a steel-rule or rotary die on long ones) follows a path in your file. Everything about the shape comes from that path, so it has to be:
- One closed path per sticker, with no gaps, stray points or overlapping duplicates
- On its own layer, named something like "Cut" or "CutContour"
- Stroked in a spot color, named exactly as the printer asks, so it outputs separately and never prints
- Set to overprint, so it doesn't knock a thin line out of the artwork beneath
- A thin stroke (0.25 pt is typical) with no fill
The spot color name matters more than the color you see. Many digital cutting systems look for a particular name, and "CutContour" is a common one; others use "Thru-cut" for die-cut and "Kiss-cut" for kiss-cut on the same file. Ask your printer for theirs and copy it letter for letter. Our dieline setup page explains the same layer and overprint rules for labels and boxes.
The three distances to get right
Every sticker file has three zones, measured from the cut line:
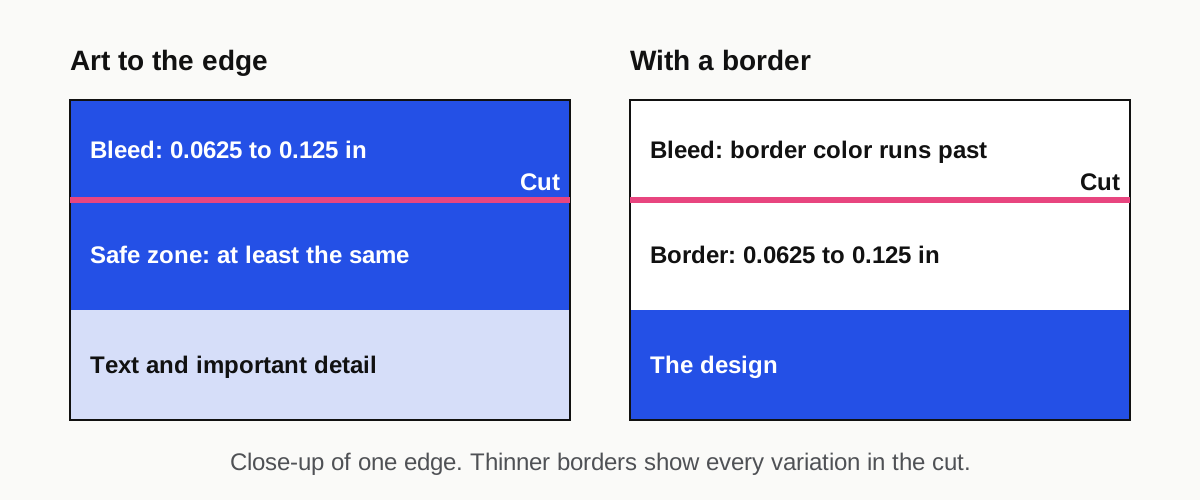
- Bleed outside the cut. Artwork must extend past the cut so a small shift doesn't leave an unprinted edge. Printers commonly ask for 0.0625 in (1/16) to 0.125 in (1/8), roughly 1.5 to 3 mm.
- Safe zone inside the cut. Keep text and important detail at least 0.0625 to 0.125 in inside the cut, more on small stickers where a shift is proportionally larger.
- The border, if there is one. Most contour-cut stickers have a white (or colored) border around the design. A border of 0.0625 to 0.125 in looks deliberate; anything thinner shows every variation in the cut, because one side ends up visibly wider than the other.
Drawing a contour cut with a border in Illustrator
- Select the artwork, then Object > Path > Offset Path with your border width (say 0.0625 in). Set joins to Round.
- With the result still selected, use the Pathfinder > Unite button to merge it into one outline. Delete any inner holes you don't want cut.
- Fill that shape with white (or your border color). This is the border, and it's printed.
- Select it again and run Offset Path with your bleed (say 0.0625 in) to make the bleed area. Fill it with the same border color.
- Copy the border shape (step 3) to the Cut layer, remove the fill, stroke it with the cut spot color at 0.25 pt and set it to overprint.
- Smooth the path. Small bumps and sharp internal points are hard for a blade to follow. Object > Path > Simplify helps, but check the shape afterwards.
Shape rules that save a reprint
- No narrow necks. A part of the sticker that narrows to less than about 0.125 in can tear when it's peeled, and on die-cut stickers may not cut cleanly at all.
- Round internal corners. A sharp V cut into the shape is a weak point and tends to lift. A small radius is stronger.
- Fewer interior cutouts. Holes inside the shape (the middle of an "O") are possible on many cutters but add weeding work and cost. Ask first.
- Mind the minimum size. Very small die-cut stickers are fiddly to peel. If your design is under about 1 in, kiss-cut on a sheet is usually the better format.
- Keep fine text off the edge. Text running parallel to the cut, close to it, shows any shift instantly.
Clear, holographic and kraft stickers need white ink
Printing inks are transparent. On white vinyl the vinyl provides the white; on clear, holographic, metallic or kraft material there's nothing behind the ink, so colors look faint and anything meant to be white doesn't print at all. The file needs a separate white ink layer, built as a spot color, covering everything that should be opaque. Our page on the white ink layer walks through it step by step.
Decide where you want the material to show. On a clear sticker, leaving the background clear and putting white only under the logo is a common choice; on holographic vinyl, leaving parts of the design without white lets the shimmer through.
What to send the printer
- A vector PDF or AI file with artwork, cut path and any white layer on separate named layers
- The finished sticker size, measured on the cut line, not the artwork
- Die-cut or kiss-cut, and the backing size for kiss-cut
- Material (white vinyl, clear, holographic, paper) and finish (gloss, matte laminate)
- For sheets and rolls: how many stickers per sheet or roll, and the gap between them
Raster artwork is fine for photographic stickers, as long as it's around 300 ppi at the printed size, but the cut path itself should always be vector. A cut line traced from a low-resolution image follows every pixel step.
Sticker and label artwork placed on a printer's cut line, with bleed, white ink and finishes on their own layers, is a fixed $75 with us as part of our packaging and label work.
FAQ
What is the difference between kiss-cut and die-cut stickers?
A die-cut sticker is cut through both the sticker material and its backing, so it comes as a loose shape. A kiss-cut sticker is cut through the sticker only, leaving the backing intact around it. Kiss-cut stickers are easier to peel and can carry printing on the backing.
How far should the cut line be from the artwork?
Most printers want the artwork to bleed 0.0625 to 0.125 in past the cut line, and text kept the same distance inside it. If the sticker has a white border around the design, make the border at least 0.0625 in wide so small variations in cutting don't show.
What color should the cut line be in the file?
The visible color doesn't matter, but the swatch must be a named spot color, set to overprint, on its own layer. Use the exact name your printer's cutter expects, such as "CutContour", so the line is read as a cut and never printed.